I know what you are thinking.
Just where has that rascal Kathy Ellen been, anyway?
Well, I moved in May
And I’m moving out in June.
“What?” you ask. “Isn’t that a tad bit crazy?”
Ok, it is a little bit crazy.
But great opportunity came up, and I took it!
I have summer school, so the place is getting subletted for the summer.
Luckily, I’m in the end process here of packing up.
My biggest decision? What books and art supplies to leave behind!
And in all of this, I’m still the official birthday Ambassador of my capoeira group!
Speaking of capoeira, here’s a picture of me getting my new cord!

I’ll write a post about the batizado week soon!
But I’ve been busy with cards!
I made one for our favorite Brazilian here to learn English, Rafael, and took pictures of the process for the one I made for his fabulous girlfriend, Marcela, who came to visit us!
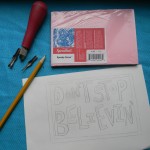
So, here’s how you make a humungous card, people!
First, you have to start with the right materials:

Which, clearly, is large paper and some gummi vitamins from Trader Joe’s!
Then you need a plan and a clever message.
Marcela likes cats and s’mores, so I had a good idea.

Here is the pencil sketch…kind of hard to see, but took maybe a minute or two.
Next up, markers!

I quickly went over the pencil lines, not being too careful, because I like when you can still see some pencil! It really looks like you handmade it if you see earlier lines. At least in my opinion. This took about two or three minutes.
And, last step:

Crayons! I use beeswax block crayons, so this was REALLY FAST!
Also, I’ve learned from experience that the marker will get ruined if you write it over the crayons, which is why crayons come last.
And there you have it!
Plenty of white space left for signing.
I brought it to class and made s’mores in the hallway.
Everyone who signed got a s’more.
It was epic.
Here’s some more art from around my room; I finally have time to tack some of it up!

I call these, the white space and the colors around them.
I crocheted some hemp and have tons of little clips, and tack these little galleries up all over the room, since I’m constantly making art that needs to be hung up! Super simple and easy. Here’s another one with some watercolor tests:

I dug up a bunch of art from last summer’s classes too!

This one was really fun; paper, crayon, and tons of paint! It also holds my keys, as you can see!

This guy was one of my favorites too! Crayons and paint and awesome bear-ness, which works for California!

This one if my personal favorite, because it illustrates an important lesson.
They are supposed to be the same picture, but clearly the top one is CRAPPY.
I did the top one on a slanted surface, so the paint ran.
The next day I was feeling pretty bad about it, and re-did it.
I keep them to remind myself how ideas and outcomes can change from one day to the next, and how trying again can bring drastic results!
And I’ll leave you with this last one.
It’s flowers drawn from a beautiful bouquet that was at a talk I attended.
I was supposed to be listening, and I was.
kind of.
While also drawing the flowers, of course.

Ok, happy Saturday, everyone!
I’ve got to switch over some laundry and keep packing!
Until next time,
KE